Eos & Followspot Control

For the past few years, my team and I have been working extensively with followspots that are controlled through the lighting console. Today’s post is a little knowledge dump of tips, tricks, and things we’ve learned over the years of experimentation. 

Why control your spots?

The idea of controlling your follow spots from the console isn’t necessarily a new one – and like many concepts and techniques in theatrical design, there are many different levels and approaches when implementing such a technology. 

At the most basic, a board controlled followspot can be something as easy as a Source Four on a City Theatrical Yoke connected to a dimmer. It’s a simple concept with equally simple execution. One dimmer, one light, you’re set. 

With a simple one-parameter light like this, it sometimes makes sense to put it into the cuelist just like any other light in your show. Record your intensities, call it a day. But there are a few pitfalls to this technique to be aware of. First is the operation of the spot itself. If you take control of the dimmer fully away from the operator, you take away any margin for error. That light is coming on if the operator is ready or not. 

While this is certainly an issue, the problem that I’ll focus mostly on today is data organization. With that light in your main cue list like every other, it makes it incredibly challenging to track the information. It also makes it hard to bop around to look at or adjust things, as now that single light is tied to the entire rest of your show, too.  

Taking it a step further...

You might be thinking “alright, I kinda see your point… but it’s really not that hard to manage the data for the single parameter…” Sure, but what if you start adding more parameters to the mix? What if you want to be able to control the color? You could add a scroller or Seachanger to your light, perhaps make it an LED, and now you have a much better looking followspot… but your data management is getting a little more complex. How do you store color? How do you handle frost vs. no frost? The intensity issue still remains as well – your operators better be ready because that light is going to come on when it’s told to!

Three Followspots in use for West Side Story - Dalton Hamilton, Lighting Designer

Moving Lights as Followspots

John Scott Ross operating a Robe LightMaster – The Color Purple

Many moving lights now have a “followspot” mode that disables pan/tilt and allows an operator to control the unit manually. 

We use mostly the Robe BMFL series of lights nowadays with either the LightMaster or Robospot controllers. The Robospot controller allows for the operator to be in a remote location while controlling the followspot using a camera and pan/tilt handle control, while the LightMaster is a small panel and handle set that mounts directly to the side or rear of a BMFL fixture. 

In my experience, the LightMasters are a little more friendly for theatrical use because they still allow the operator to have a physical connection with the light. Many experienced followspot operators don’t love the Robospot control system if the cues are full of tight shots and theatrical nuance. They work great for full-body open white rock and roll, but not so much for that ¼ body soft edge far upstage center pickup in the middle of an emotional ballad. 

From a rental standpoint, the LightMasters are also just… cheaper. 

The LightMaster controller connects to the light via USB and when connected, automatically disables the Pan/Tilt on the fixture and puts the light into its Followspot Mode. From there, the operator is able to map certain parameters and features to the various buttons, dials, and faders on the light master. We typically map only two things to the actual controllers – intensity and iris. Everything else about the light is controlled from the lighting console. 

We set the maximum intensity on a cue-by-cue basis, and the operator has a manual fader to take their own pickups. This fixes the issue we first discussed in this post while still allowing for artistic programming. 

Getting the Console Ready

We’ve experimented with a few different ways of programming organization over the years to get to where we are now. We started with the concept that I talked about before – recording the lights right into the main cuelist. From there, we experimented with two cuelists. Finally, we landed on multiple lists. One per spot. 

SINGLE CUELIST

PROS
  • Easy to program
  • No “unusual” setup needed
  • Easy to match timing between spots and lights
CONS
  • Sometimes hard to decipher information
  • Spots get lost in the sea of data

TWO CUELISTS

PROS
  • Still pretty easy to program
  • Only managing data between two lists, can use OOS Sync or manual executes to link
CONS
  • How to display data for multiple spots? Parts? 
  • More than 1 spot, the data still gets lost
  • Harder to display PSD for each operator

MULTIPLE CUELISTS

PROS
  • Complete separation of data between your lights and your spots
CONS
  • Most complex to program
  • Most time-consuming, but arguably saves time troubleshooting/editing later.

We ultimately decided that the best way was to put each spot into its own cuelist, and then trigger those cuelists using the main lighting cuelist. There are a number of important things to set up to make this kind of control work reliably and well.

Partitioned Control

The most important part of this setup is partitioned control in Eos. If you’re not familiar with partitions, you can read more about them here in the Eos manuals. Essentially, a partition is a way to separate out control of channels and limit those channels to certain users or cuelists. 

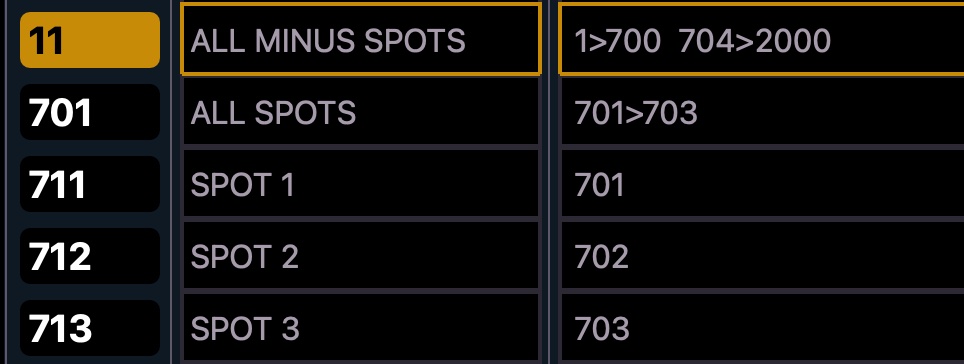
In a showfile with three followspots, we have six partitions:

  • All Channels
  • All Channels Except Followspots
  • Only Followspots
  • Spot 1
  • Spot 2
  • Spot 3

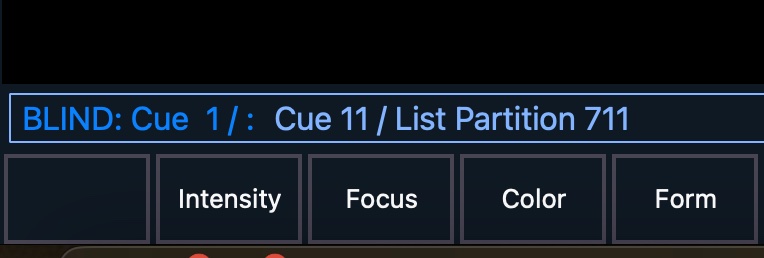
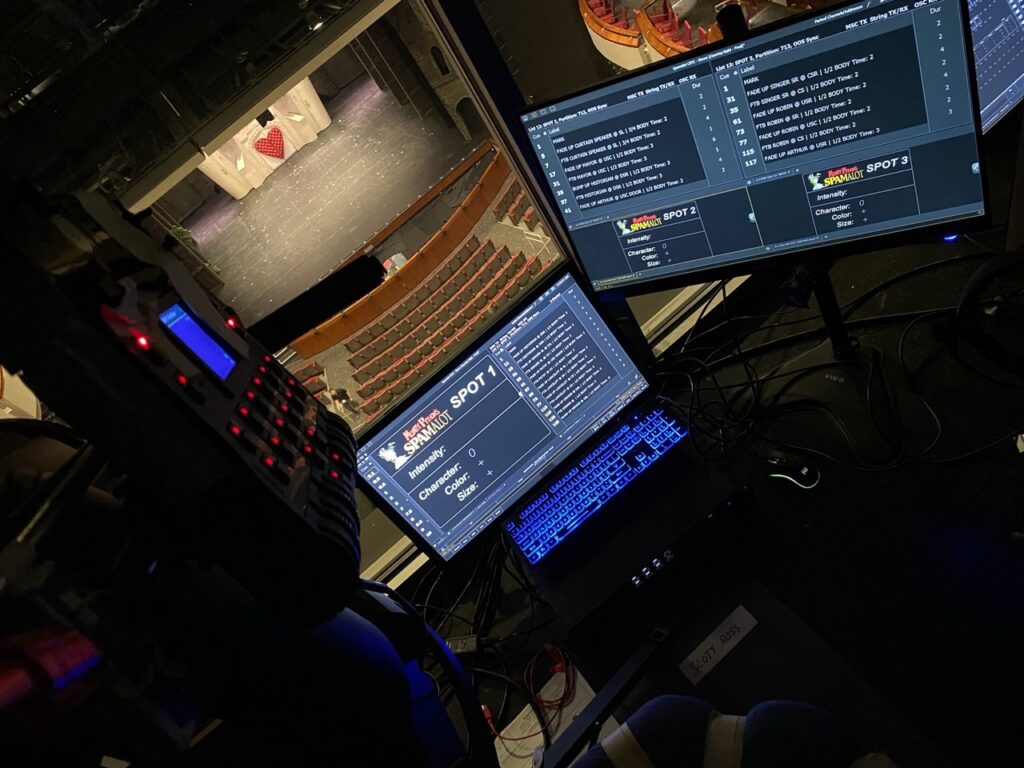
We number these based on spot, so in the image example the partition number matches the spot cuelist number with a 7 prefix because the spot channel numbers were in the 700s.

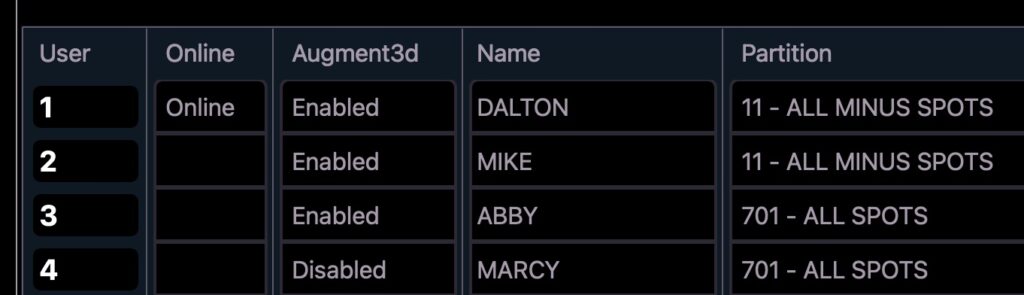
Then, those partitions are assigned as follows:

Lighting Programmer – Non-Spots
Followspot Programmer (ALD) –  Spots Only
Main Cue List – Non Spots
Spot 1 List – Spot 1 Partition
Spot 2 List – Spot 2 Partition
Spot 3 List – Spot 3 Partition

(The board operator/run of show gets assigned to the “everything” partition once we get into dress rehearsal)

Okay, but why is this important to do? Well, setting up the partitions in this way ensures that only data that is supposed to be put into a cuelist is put into that cuelist, and nowhere else. It ensures that when you hit update, you don’t have to double check that you’re updating the right things into the right places and you haven’t accidentally recorded spot 3 into your main cue list. While programming, it makes sure that the ALD (or whoever is programming the followspots) can’t accidentally change the color of some other random light while no one was looking. 

Partitioned Control In Setup

Assigning Partitions To Users

Assigning Partitions To Cue Lists in Cue List Display

Cuelist Partition Assignments

Out of Sequence Sync

Out Of Sequence Sync is one of the best features on Eos Family consoles that so many people don’t know about. Read more about it in the Eos Manual – but the short of it is that OOS Sync is a way to quickly link cue lists to each other so that one triggers another one. 

In our showfile, we use OOS Sync to link the three followspot lists back to the main list. This is done in the Blind Cue List Index Window, or Tab 16. 

List one is set to Execute Spot Lists 11, 12, and 13. OOS Sync is turned on on all lists. 

This allows us to hit GO on list 1, and if there’s a cue with the same number in lists 11, 12, and 13, they will fire as well. If we GoToCue 125, lists 11, 12, and 13 will jump with us. Most importantly, they will jump to the closest cue number in those lists going down. So if we are in LX125, but the last spot one cue is 119, OOS will ensure that going to cue 125 will trigger cue 119 in the spot 1 list. 

Making The Cues

One of the important parts of this setup is that your followspot cue numbers should match your lighting cue numbers. That means that it’s possible that spot 2 might have their first cue as number 26, but that’s okay. It’s certainly possible that you could just number the spot cues in numeric order, but that requires you to then manually add executes to your main list for every spot cue that you need to trigger. You then also have to maintain those executes and delete/change them as needed throughout the tech process. Trust me, it’s a pain and you don’t want to do it. While it might make your eyes twitch a little bit to have large gaps in your spot cue numbers, it’s a quick adjustment that will save you so much time. Now you’re thinking “alright, sold! but… how?”

If you number your cues the same as your main lighting cue numbers, then syncing the whole thing is only a few button clicks away – turn on OOS Sync, link up your lists, and you’re running!

Displaying the Data

At its most simple, you can display the spot cue lists using PSDs that are linked specifically to the spot list that you want to display. This is one of the many advantages of splitting up the control into individual lists. With Nomad dongles being so affordable, it’s becoming easier and easier to give each operator their own live cue sheet. 

Magic sheets take this to the next level, but there are a few things that you’ve gotta look out for. As you’ve probably seen on my Instagram, we display the color, target, and size data for the operator on these magic sheets. But where does that data come from? After all, the operator is controlling the pan/tilt and iris…

We accomplish this by using “dummy” data in focus and beam palettes programmed into the cues. Each character gets a focus palette with their name, and each size gets a beam palette. It’s important to note that you have to actually record hard values into these pallets – but since the RoboSpot controller overrides the motors, the data doesn’t actually impact the light. 

In the above image, the Spot One operator has their cues on the left monitor and the other spot operator cues on the right monitor (they call the others).

Example Eos Show File

I know, there’s a LOT of information in this blog post and it can be overwhelming. 

I took some time to put together a basic showfile outlining everything that I talked about in this post. In it, you have a set of generic channels as well as three followspots. There are partitions set up as well as four cuelists properly partitioned for control and playback. Map the main list to your main fader and hit go/back a bunch to see how the various lists follow along. Try a few go-to-cues in list one out of order and watch what happens. 

Auto-Programming The Spots

One of the challenges we discovered with using board-controlled spots is that it meant having to do a lot of duplicate data entry – once into the spot paperwork and then again into the console. I set out to figure out a way to automate this!

I expanded some of my existing FileMaker solutions to essentially handle everything related to this – it does all the setup, it creates the lists, patches the lights, and makes the cues themselves. 

As many of you may know, I have a whole video series on how to create your own FileMaker based lighting paperwork solution. I don’t currently have anything specific to followspot cues there, but many of the lessons in the series can be used to help figure out how to make this yourself. One day, I hope to add followspots to the series. 

In the meantime, check out this Instagram post for lots of screenshots as well as a great Q&A in the comment section:

So, that was a dense blog post, I realize – a lot of technical information, but hopefully you were able to get some useful information to help you design and program your followspots more efficiently. Have you used any of the tips? I’d love to hear about it!