Vor

For the past year or so, you’ve probably seen me posting about Vor – a new tool from Borealis Solutions that has quickly become an essential part of my lighting design tool kit. As I’ve used it more, I’ve found countless use cases beyond just the obvious ones – and today’s post is a deep dive on all of it! In this post, I’ll walk you through how I set it up, how I use it, and the future plans I have for it.

If you’re coming to USITT 2023, be sure to check out our panel discussion on Vor on Friday March 17th @ 10am! – More on the panel discussion can be found here

What is Vor?

Simply put, Vor is a piece of software that allows you to capture video and audio of your rehearsal or show while overlaying key information from ETC Eos Family Consoles, Disguise media servers, and so much more! Anything that spits out OSC (Open Sound Control) messages can be overlaid on your video file. 

Vor comes in two varieties – Vor Mobile, which runs on iOS and iPadOS devices and Vor Desktop, which runs on MacOS computers. In today’s post, I’m mostly going to focus on the desktop version but many of the configuration and layout options are the same.

You can download a free trial of Vor, as well as get more information about it here! There’s even a student license available for only $50/year!

Alright, sounds cool, but what’s the point? Why is this useful? Why is it worth the money? Read on. 

How do I use it?

Vor in use at dress rehearsal for west side story
Lighting by Dalton Hamilton

As many of you know, I wear multiple hats. My main hat is that of a lighting designer for live theatre throughout the United States. My other hat is as Director of Production for City Springs Theatre Company in Atlanta, GA. Vor has found its way into my workflow in both of these areas. 

My main uses:

  • Rehearsal Room / Designer Run Capture
  • Technical Rehearsal Notes
  • Dress Rehearsal Notes
  • Production Archives

How do I set it up?

Setting up Vor Desktop is pretty simple. All you need is a camera source and a microphone. I generally capture video using a BlackMagic UltraStudio Recorder 3G connected via USB-C to my laptop (2021 16″ MacBook Pro, M1 Max). I’ve also had successful results using generic HDMI capture devices like this one, but your results may vary. I prefer the Ultra Studio because it gives me the flexibility to choose between SDI and HDMI input sources. 

For the camera, it depends on the venue. In larger theaters, I typically can get a line from the balcony rail SDI camera. My new go-to is the Panasonic Lumix BGH-1 , but any camera that can output HDMI or SDI will work. Sometimes, I use a GoPro’s HDMI output or throw one of my Canon Cameras on a tripod at the tech table. I’ve also been looking forward to experimenting with the new continuity camera features in MacOS Ventura, because in theory I should be able to use the camera in my pocket as an input source. Don’t have a fancy camera? Not a problem. You can even use the built-in FaceTime camera on your computer. 

For audio, you can choose any audio device that is attached to your computer. In the simplest example, you could even use your built-in MacBook microphone as an audio source. I use a custom interface box that I designed and created for rehearsal note capture, which takes in program from the sound department on the left channel and intercom audio on the right channel. This allows me to take notes during a rehearsal and have those notes recorded directly into the video stream. It’s as simple as making a little adapter that taps the speaker wires of a headset connection. 

Configuration

Alright, enough talk. Let’s look at some of the settings and options for getting your Vor system up and running. Remember, this is just how I personally set things up. There are so many ways to customize the layouts and settings to fit your use case. Check out the official Vor documentation for examples!

General Tab

  1. SHOW NAME This is pretty self explanatory. The data you put in this field can be used elsewhere throughout the program – in overlays and filenames, for example.
  2. NUMBER This information can also be used in overlays and filenames, and can even be dynamically updated using OSC from your console.
  3. LENGTH This is how many digits you want your “number” to be. Helpful for keeping filenames and such to a standardized number of characters.
  4. sACN OUTPUT I’ll cover this more in a later section, but Vor allows you to output live sACN data on your control network, so you can create Eos Magic Sheet objects to show the current recording status.

Connections Tab

5. EOS CONSOLE CONNECTIONS
Here you can add Eos Family Consoles to Vor (read more below)

6. DISCOVERED EOS CONSOLES
Vor can discover ETC Eos Family Consoles that are on your current network and will display them here. In the example image, it sees Eos Nomad running on my local machine as well as several other pucks, RVIs, and consoles. Clicking on the little red arrow next to a discovered console will link it to your Vor session. 

7. OSC CONTROLS
Clicking on this will open a popover with all of the various OSC commands that Vor can listen to. You can also download them here.

There are tons of other kinds of connections that Vor can listen to, but the general concepts are the same. I’m going to focus on Eos and Custom OSC for this post. 

You can also enable cue photos on this screen! We’ll talk more about that later. 

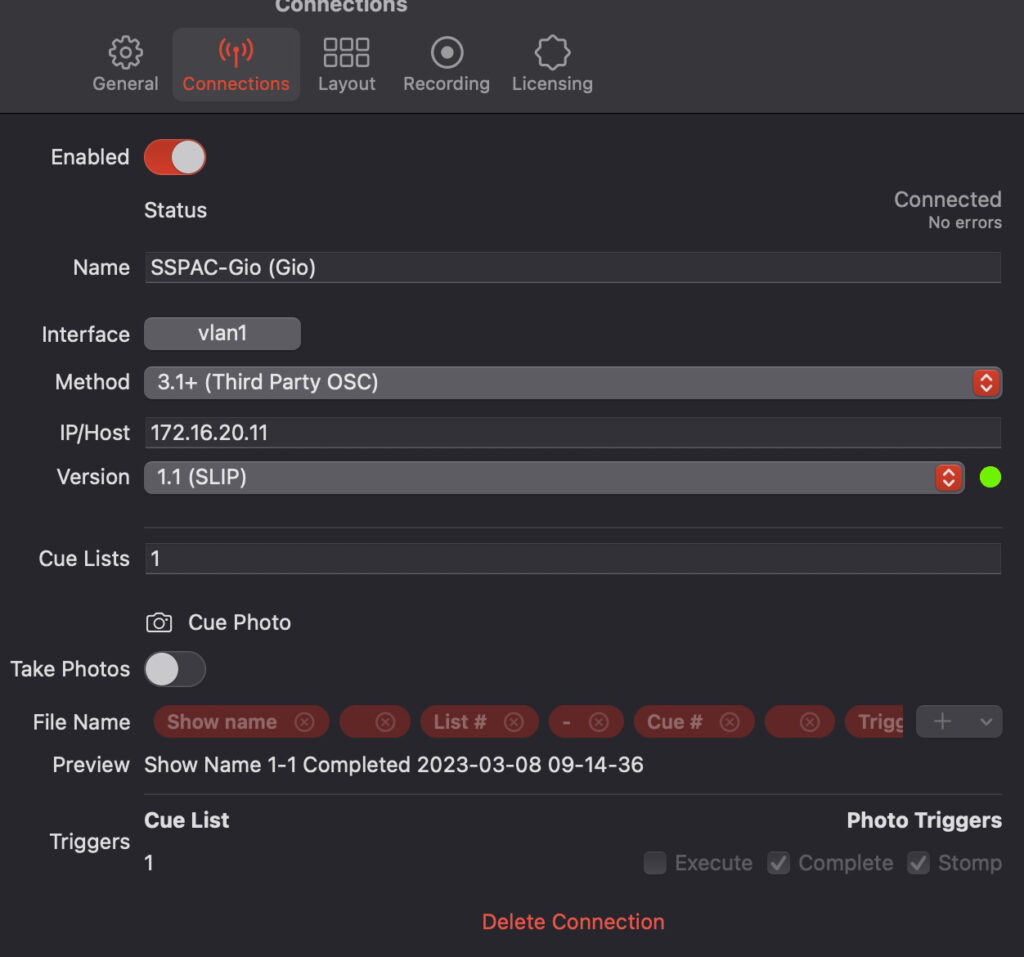
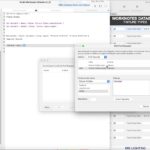
In the example image, an Eos Family console has been connected to Vor. 
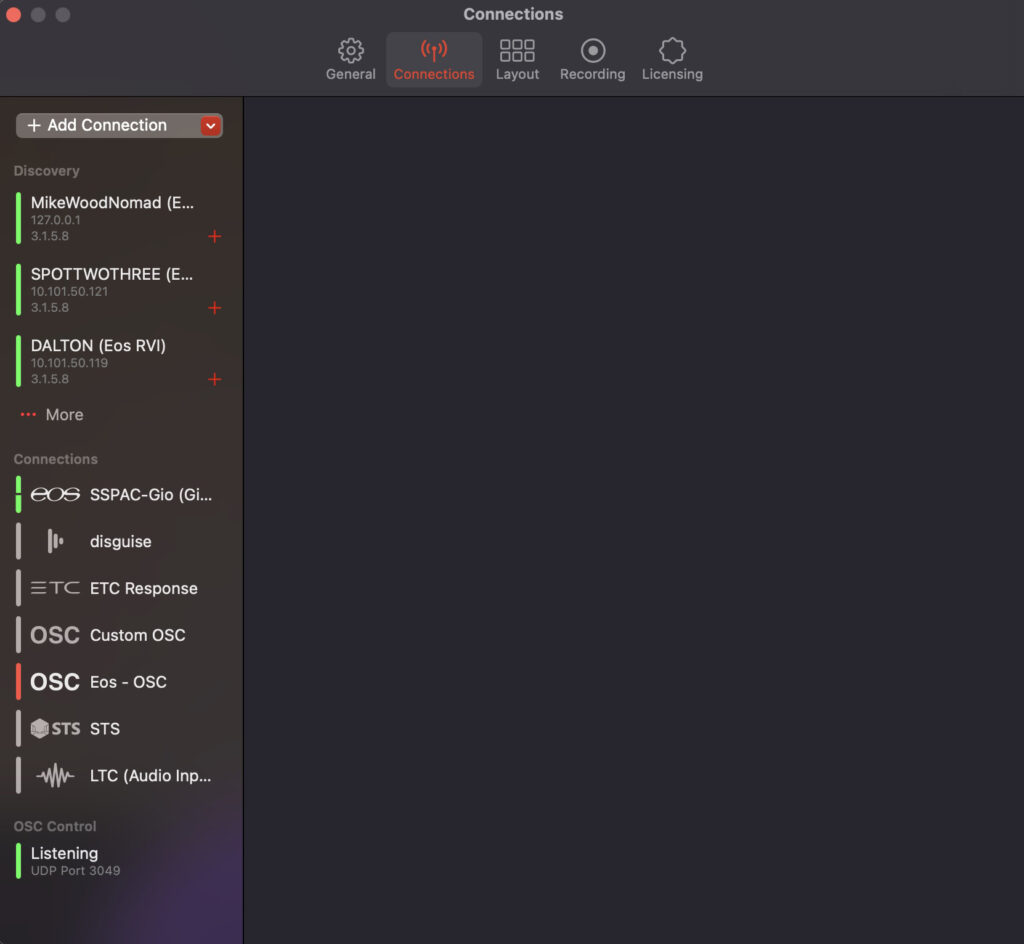
8. ENABLE/DISABLE
Pretty self-explanatory. Turns on/off the connection

9. CONNECTION STATUS
Shows the connection status of the current connection. 

10. CONNECTION NAME
User-configurable name for this connection. Useful if you are connecting multiple devices and want to keep track of which one is which.

11. INTERFACE
If you want to bind this connection to a specific network interface on your computer. 

12. OSC METHOD
Choose if you are running Eos V3.1 or earlier. In V3.1+, ETC enabled a dedicated port for third-party OSC connections that requires no special configuration other than enabling OSC on the console. 

13. IP
The IP address of the console

14. VERSION
Which version of OSC you are using. You can reference the OSC Spec for more information, but for today’s purposes just make sure that this matches the setting in your Eos Shell. 

15. CUELISTS
A comma-separated list of the cue lists that you would like information about. 

Layout Tab

The layout tab is where you setup exactly how you want all of your overlaid information to appear on your video. You can align things, move them around, and make your interface match your own style and needs here. 


Recording Tab

I skipped over some of the settings at the top because they’re pretty self-explanatory toggles. 

 16. CAPTURE DEVICES
This is where you can specify the camera and audio devices that Vor will use to capture. You can also flip your video as needed (for example, if your camera is underhung on the balcony rail or if your electrician had a hard time with geometry)

17. AUDIO CHANNELS
Vor records up to 8 channels of discrete audio into your video. You will see a preview of each channel that your sound device supports here and you have some control over level by clicking on the little speaker next to each channel. 

18. FORMATS
You can choose between various video and audio formats here, as well as overall quality settings. 

19. FILE NAMES
You can configure exactly what you want your filenames to look like here. This is where the information that you put in on the first tab comes into play. Use the + dropdown on the right to create a customized filename. 

Vor In Action

The Rehearsal Room

WEST SIDE STORY REHEARSAL (2022 CITY SPRINGS THEATRE)

At City Springs Theatre Company, I’ve built a Vor recording setup directly into the rehearsal hall. There’s a relatively cheap wide angle SDI camera mounted high up on the downstage wall feeding video to a MacBook Pro through a BlackMagic Ultra Studio Recorder. Audio is delivered over Dante Virtual Soundcard from an X32 Rack with multiple mics around the room. (Of course, it could be as simple as the MacBook mic or a USB mic)

The recording location for the videos (#20 in the above configuration guide) is set to a shared Google Drive folder that the cast and designers have access to throughout the rehearsal process. 

Stage managers are able to click a single record button to capture a piece of choreography or blocking, and as soon as they click “stop” the video is in the shared folder and viewable by everyone on the team. 

The Designer Run

How many of you have been to a designer run with 4 different GoPro cameras mounted to tables and to various architecture in the room? At CSTC, my rehearsal room Vor setup allows us to capture a wide-angle room video and easily distribute it to everyone within minutes of the run ending. 

The overlaid clock can help designers calculate follows or cue timings, and having everyone working from the same video with the same timestamp overlays helps every department to be on the same page from the beginning. 

TIMELAPSED VERSION OF A DESIGNER RUN

Tech Rehearsals

Multiview recording of The color purple featuring com discussion

On my shows at CSTC, I have a multi-view video system that sends various cameras all over the backstage areas. On The Color Purple, I experimented with sending that video directly to Vor as well (again, using my BlackMagic Studio device.) While the IR and conductor feeds really weren’t necessary, having the composite view of the overhead AND FOH cameras was a very valuable tool to help see where moving light presets might need touching up. 

For audio, I used my com capture box to record the SM and Lighting channels.

Dress Rehearsals & Previews

Dress rehearsals and previews are when things really start to come together and run in real-time. Vor was born for this! 

With my recording setup, I’m able to record notes right into the video file. We start at the top of each act and record all the way through, then scrub back the next day to go through our notes. Because we can see exactly when cues fire, how long their fades are, and when they complete all in one place, we’re able to make informed choices in timing and level adjustments. No more trying to decipher that handwritten note that was scribbled quickly in the dark!


WEST SIDE STORY DRESS REHEARSAL NOTES
LD: DALTON HAMILTON | PROG: WILL ELPHINGSTONE | SM: DANIEL LEMIEN

Show Runs & Archival

ARCHIVAL VIDEO OF “DANCE AT THE GYM”
LD: DALTON HAMILTON / CONDUCTOR: MILES PLANT

For our shows at City Springs, I try to grab a final tech archival video during the closing weekend of performances. I ingest my multi-camera stream into Vor as well as SM calling audio and capture the full show. 

What you’re seeing here is actually a multi-view inside of a multi view. The Eos magic sheet looking square is just that, a magic sheet that is broadcast around the CCTV system so that we have accurate current cue information as well as the show clock. The fourth input on the MV is blank, and that’s where I threw my Vor overlay. Just like in the dress rehearsal video, you can see the three followspot cue lists as well as the main cue list information. 

Having documentation like this makes it that much easier to remount a show for another venue, a tour, or remount. Capturing the multi view allows the designer and production team to see the show from all kinds of different angles that just the FOH shot might not get. 

More Examples

Other Features

Cue Photos

The Production tier of Vor allows you to capture cue photos automatically of every cue in your show. You can choose exactly when the trigger happens, too! When the cue fires, when the cue completes, etc. The photos themselves contain all of the layout/overlay objects that you see on the main screen, so creating that documentation is a breeze. 

The best part about this is that it can do it while it’s also capturing your video. So you can capture both cue archive photos AND show archive video all in one pass, all with one camera, all in one software!

This feature is available in Vor Production – I go over the differences in versions at the end of this post. 

sACN Output

Vor can output sACN back to your Eos Family Console – this allows you to see the recording status of your system in real-time! You can even download a demo magic sheet to customize and import into your show.

The demo file comes complete with the macros and magic sheet objects you need to be up and running quickly. 

Simply choose a Universe and Address on the “General” tab in Vor settings, make sure they match in Eos, and you’re all set!

Screenshot from Vor Demo Magic Sheet

Download the Eos demo files:

Custom OSC

While there are all kinds of great built-in Eos overlays you can create, I also love to add a few extra things – a command line for my programmer as well as the current show file name. Because Eos sends this data via OSC, I’m able to listen for it in Vor and overlay it wherever I want it. 

In the example photo, look at the very top. You can see the live cue list on the left and the current Eos show name on the right. 

And here are the addresses that I use to overlay this information. I set them up in a custom OSC connection from the main Eos console. 

Pricing & Demos

So the big question that everyone is wondering – what does it cost? Another thing that I love about Vor and the people behind it is that they really want to create a tool that is accessible and approachable by anyone at any level of the industry from student to major commercial productions. They have a tiered pricing structure, a 30-day free demo, and student licenses available to help meet the needs of just about anyone who could want to use it. There’s even a completely free version that does just the basics!

Free Personal Production
Weekly Cost
Weekly Cost $19.99
Monthly Cost
Monthly Cost $19.99 $39.99
Yearly Cost
Yearly Cost $199.99 $299.99
Features
Record Videos
Record Videos
Unlimited Video Length
Snapshot (Stills)
Snapshot (Stills)
Custom Overlay Position
Additional Codec Options
Eos (Cue Photos)
Eos (Cue Photos)
Connections
Number of Connections
Number of Connections 1
Eos
Eos
ETC Response
ETC Response
disguise
disguise
Custom OSC
Custom OSC
LTC (Audio Input)
LTC (Audio Input)
STS
STS
Hudson Motion Control
OTP-4
OTP-4
PSN2
PSN2
Widgets
Number of Widgets
Number of Widgets 1
Vor Watermark Free
Vor Watermark Free
Eos
Eos
Eos (Elapsed)
Eos (Elapsed)
Custom OSC
Custom OSC
Date & Time
Date & Time
disguise
disguise
Automation Cue
Automation Cue
Automation Position
Automation Position
Show Info
Show Info
Static Text
Static Text
Static Image
Static Image
Remote Control
Start/Stop via OSC
Start/Stop via OSC
Edit Show Info via OSC
sACN Status
sACN Status

Conclusion

It’s hard to imagine a time where I didn’t have Vor in the toolbox. It’s quickly become one of the most valuable collaboration and documentation tools that my team and I use on a day-to-day basis. I can’t recommend enough giving it a shot and seeing where you might be able to find a use for it in your workflow!

Disclaimer

I am not affiliated with Vor other than thinking it’s an awesome product that you should get to know. This site uses affiliate links and Mike Wood Lighting Design may earn a commission from certain links. This does not affect your purchases or the price you may pay. For more information, please check out our privacy policy

Prev FileMaker #5.2
Next DIY Pixel Bars

Leave a comment