Essential Workflow Tools
It doesn’t matter if you’re programming a complicated effects sequence on a lighting console or if you’re negotiating an hourly rate for a client on a show; data is key. Being able to analyze hard data is an essential tool.
Often as a freelancer, you’re working on several projects at once. Every day is probably a mix of various tasks for various clients in various stages of the production process. Even if you’re in tech for one project, you might find yourself sending emails or drafting for another project during your dinner break. In the theatre world, we’re often working for flat fees. In some markets, it’s day rates. In others, it’s hourly. For a long time I tried to figure out the best way to track my time across all of these things in a way that was easily accessible and searchable. I used a Google Calendar for a while, then spreadsheets for each show. I started to add it into some of my FileMaker projects… but it was all just cumbersome and clunky. Enter: Toggl – the free time tracking software.
Toggl has changed the way that I collect data and track my time across multiple projects at once. It is available in several forms: a website, a browser plugin, a desktop app, and a mobile device app. It has over 100 integrations available, meaning that it can link to services like Slack or Google Calendar.
While there are all kinds of cool features available in the paid versions of Toggl, including team tracking and customized reporting, today I’ll be focusing on the free version.
Toggl has three important organizational tools: Clients, Projects, and Tags.
Clients are just what they sound like – for me, it’s the producing organization that I’ll actually be billing for services/items. I also have a “Self” client that I have set up to track things that I work on that are not necessarily related to any one particular project or show. These are things like website editing, resume work, client acquisition/cold emails, taxes, accounting, etc.
Each client can have multiple projects associated with them. Think of projects, well, as projects. Typically these are specific shows that I’m working on. Some clients will have multiple projects and some I’ll list a generic “administrative” project for. For example, as the resident LD at City Springs Theatre, sometimes I’m working on paperwork or planning for something larger than just a single show/project.
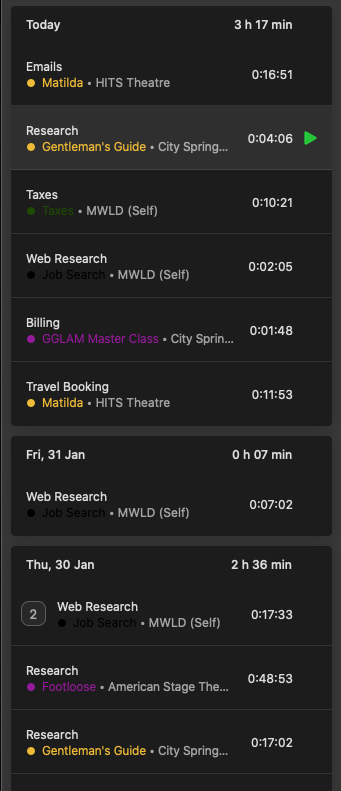
Tags are where Toggl becomes a super useful data collection tool for me. Tags allow you to classify time entries across all clients and projects. Think of them like hashtags on social media. I can search through all of my time entries for #drafting and see how many hours I’ve spent drafting across all projects in the past month or quarter.
I find myself using the desktop version of Toggl more than the other versions. I have it always open on a secondary monitor for quick and easy access. Second to the desktop version is the mobile app, which is invaluable when out in the field. Since I have it linked to my Google Calendar, I get popup notifications as scheduled events are about to start asking me if I’d like to track the event in Toggl.

Okay so, we’ve got all this data. That’s great, but what do I do with it? It’s a common frustration in the theatre design business – figuring out how much time actually goes into a project and then assigning an actual hard dollar value to it. I’ve asked several of my friends in the theatre business how many hours go into their work and I’m always surprised to find how many of them don’t know. The reason, perhaps, is that they’re being paid a flat fee regardless of how many hours they work so it hasn’t occurred to them to track things on the granular level that I do.
We will save the discussion on rates and wages in the theatre industry for another blog, but let’s think about this from an overall income standpoint as a freelancer. All of the referenced projects above happened within a 2 month period. So using the mystical powers of math, we can figure that in those two months I worked a total of 342 hours and was compensated $11,950.00. About $35/hr overall.
Obviously, this is a relatively small sample size. To get useful data, we need to look at longer periods of time. Hopefully in a year or so I’ll be able to update this post with more data, but for now, let’s use the numbers above as a baseline for discussion purposes.
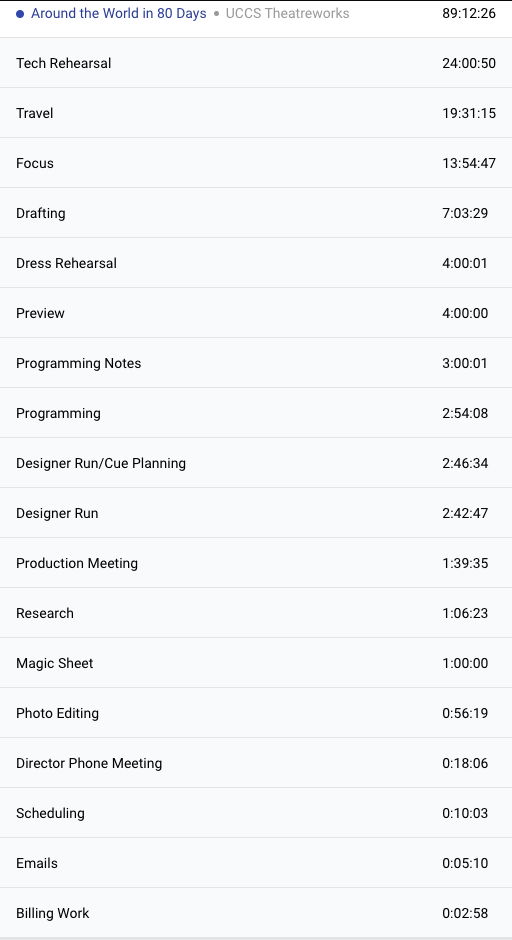
If we assume that those two months are typical (and as any freelancer knows, they can range wildly from ½ that to 2x that sometimes) we can extrapolate that annually to $71,700.00. From there, we are able to make all kinds of informed decisions. Most useful for me is being able to determine if a project is “worth it” when it comes to the time commitment involved vs. the compensation offered. Without hard data, I’d be shooting in the dark when evaluating offers. Now I know that if I’m offered a straight play at a theatre with a similar size and equipment selection as “Client A” above, it’s probably going to take about 85-90 hours total. If I’m offered, say, $1200 for this theoretical show, I know that there’s no way that I can responsibly accept the contract because I won’t be able to make enough money to make my budget numbers.
All of this is just to prove how valuable of a tool Toggl has been to me in the 6 months or so that I’ve been using it. Previously, I could do some rough calculations based on what I thought the total time I worked on something was vs. how much I made, but now I have cold hard numbers to reference. Obviously, the value in Toggl for projects that you’re billing hourly is clear – you can have a detailed report on exactly what you were doing and when, should you need to turn in any kind of documentation on your hourly billing. Unfortunately, the free version of Toggl doesn’t let you mark things as billable, but as @elivanhooff pointed out to me on Instagram, you can just use a #billable tag to get similar results.
The only real frustration I have with Toggl is that it’s not currently possible to have more than one timer running at once. I understand WHY this is the case, but sometimes it would be nice to be able to have. For example, if I’m on a plane traveling for one project while drafting another. It’s possible to go back after the fact and have overlapping time entries, which I do. I just wish that I could track more than one thing at a time.
Alright, so we’ve got data, now we need to bill our clients for it. Working on a show or two a month? Sure, you can probably just make invoices in Excel and send them and track them yourself – but if you’re working on lots of projects with multiple due dates and invoices at once, it becomes vital to use some kind of accounting software to keep track of it all.
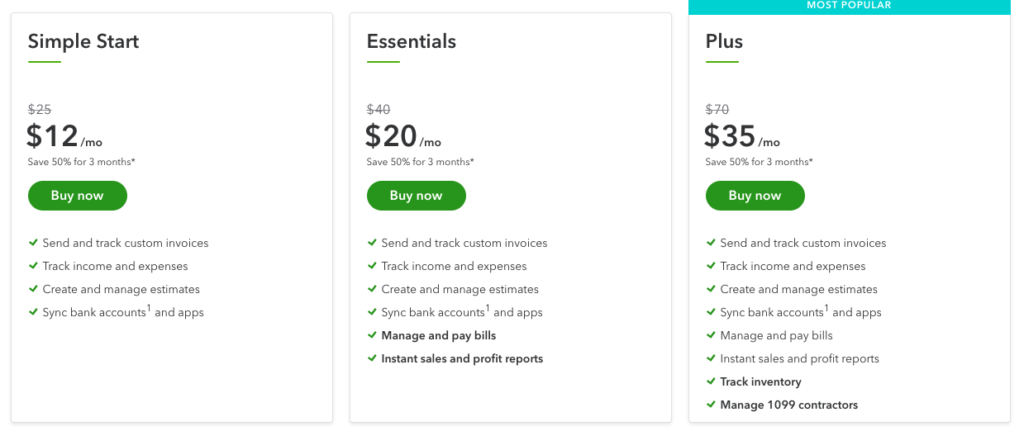
I use Quickbooks Online for all of my business accounting. I use the “essentials” plan, which is $40/month. The cheapest plan they offer, “Simple Start,” is $25/month and is probably enough for the vast majority of freelancers. I use the “Essentials” plan because it allows for recurring/automatic invoices, which helps as I have a few clients that I bill monthly. To me, the time savings of not having to worry about remembering to create these invoices every month is worth the $15.
I use Quickbooks Payments to allow my clients to pay me directly from their emailed invoices. Depending on the client, this can mean either electronic bank transfer or credit cards. This means no more waiting for a week or two for a check to be cut and mailed – instead, I have my funds within a few business days of the client paying.
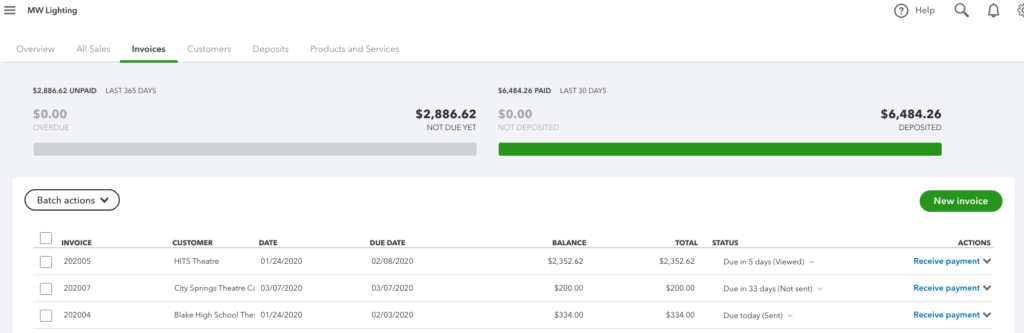
Another feature of the “Essentials” plan that I love is progress invoicing. Typically with a theatrical client, I have three main pay dates. The first is upon signing the contract, the second is upon paperwork submission, and third is on opening night. Typically I also have various travel and other expenses due as well. In the past, I would need to remember to prepare invoices for all of these various things on the particular dates that they were due. Now, I’m able to first create an estimate within Quickbooks for an overall project, and then bill parts of that invoice over time.
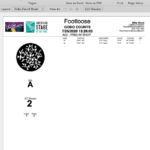
For example, here’s the start of a progress invoice for a theatrical project. This started out as an “estimate” and now, as you can see in the “due” column, I’m able to specify how much of each line is due on the current invoice.

I also rely on Quickbooks for expense tracking, come tax time. I don’t need to hunt down receipts or go through credit card statements in January, assuming that I’ve been responsible and kept track like I should.
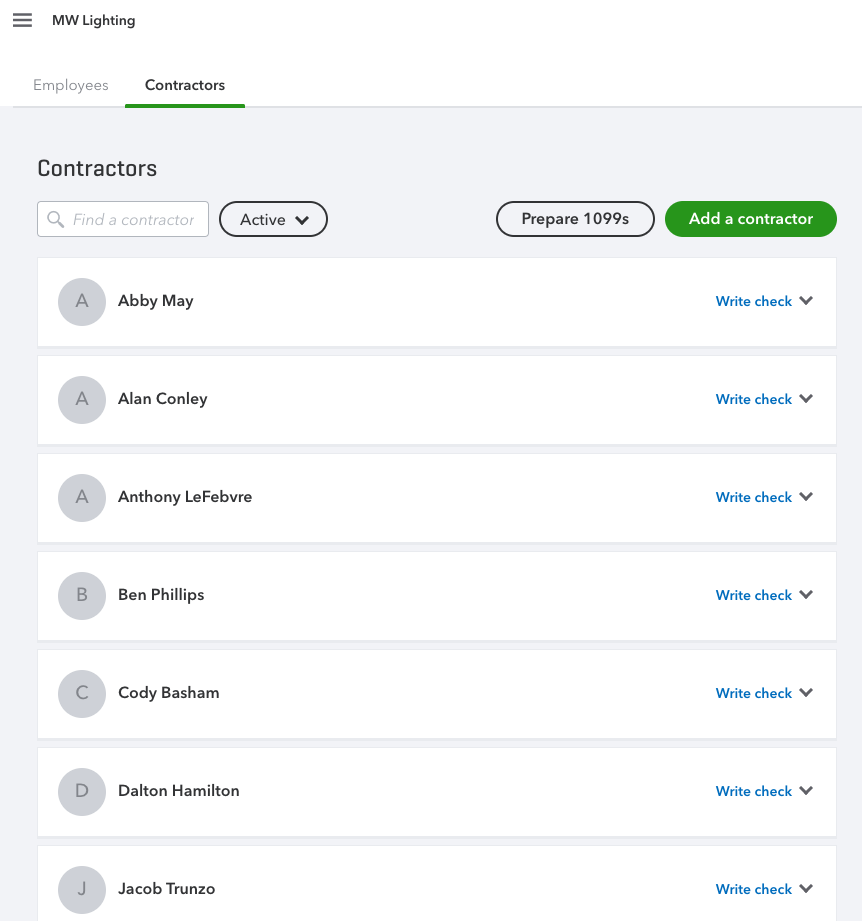
Because I often hire subcontractors, I’m able to track their 1099s and issue them every year all within the software. I don’t have to manually collect W9 forms from them, either. I’m able to enter their contact information and then they get a secure link to enter all of their tax information. I don’t need to have a file cabinet full of other people’s sensitive data anymore!
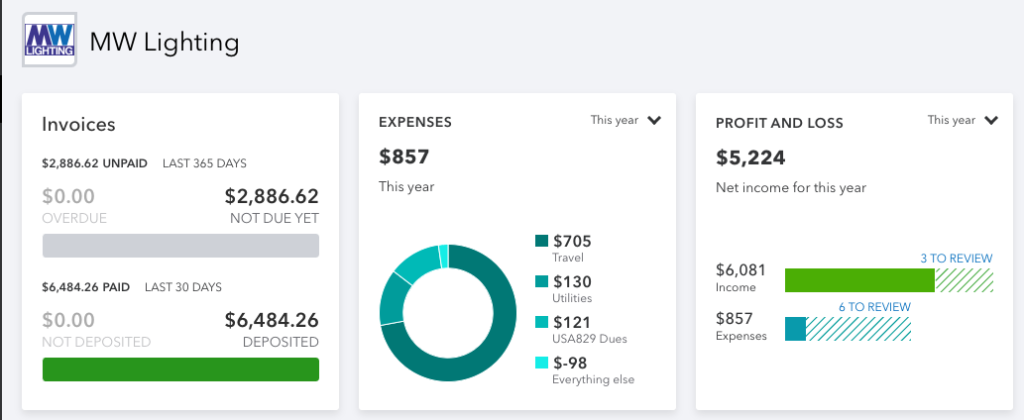
Finally, my favorite parts of Quickbooks are the reporting tools. As we’ve already established, I love data. Within Quickbooks, I can quickly see where things are with my finances in real time. I can see who currently owes me money and I can see comparison data from previous periods. Every week, Quickbooks emails me a summary of sales for the week compared to last week, separated by project.
This section is MacOS specific, but I’m sure something similar exists on Windows.
One of the most challenging things as a freelancer is managing communication between all of the various projects that you’re working on simultaneously. It’s easy for something to fall through the cracks in the never-ending stream of emails.
I use Smart Mailboxes in the MacOS Mail app to help me stay on top of this a little bit. Now, before I dive in it’s important to note that I am an inbox-zero kind of person. The only things that stay in my inbox are things that I actively am working on or need to reply to. When I’m done with an email, it gets archived. I find that this makes it easy to keep track of things and it’s also less stressful. I shudder when I see a friend’s phone with something like 45,000 unread emails. Ugh.
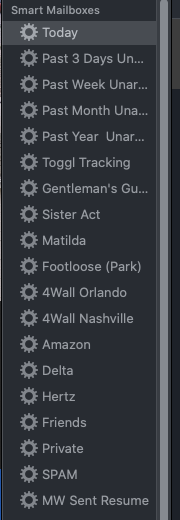
Right now, here’s what my Smart Inbox setup looks like: (photo left)
The top 5 boxes are the most important. They’re set up to filter messages according to the date they were sent, so I can quickly see aging messages that I haven’t gotten back to.
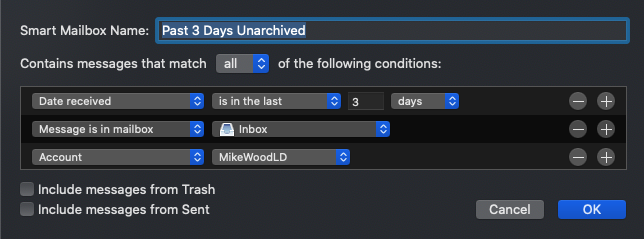
So far, these boxes are set to only search what is currently in the Inbox. Below these five boxes are other searches which also include archived messages
6th down is a Toggl tracking box. This gathers my weekly Toggl summaries so I can quickly go through them.
Below that are active projects that I currently have – right now, there are only 4 listed. These obviously change throughout the year. They’re set up to recognize certain keywords within certain timeframes.
One of my first rules of production email is to ALWAYS include the name of the show or an abbreviation of the name of the show in the SUBJECT line of the email. For example, for an upcoming production of A Gentleman’s Guide to Love & Murder, we’ve all agreed to abbreviate it GGLAM. So, every email I send about the show has the subject of “GGLAM | Actual Subject here.”
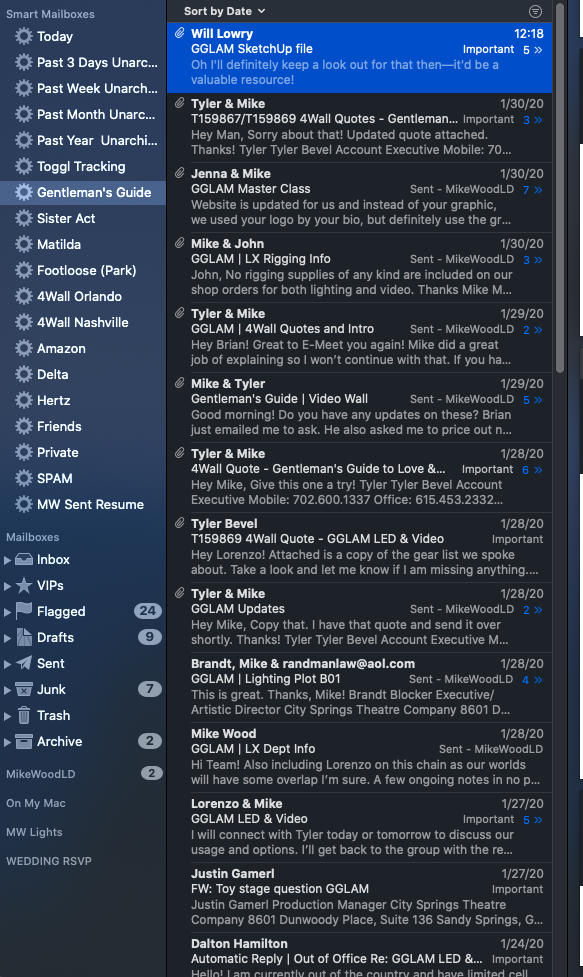
Below my show-specific Smart Boxes, I have quick access to emails from my usual vendors, as well as Amazon notifications, travel emails from Delta and Hertz, A group filter of my friends, a private inbox which searches for things like bank notifications, a SPAM box, and finally, a box that searches for messages I’ve sent which contain my resume as an attachment. There are 942 of those since this email account started in 2012. Yikes.
In addition to Smart Mailboxes, I also have a series of IMAP folders on my server that I use to keep track of various client acquisition emails. Within the folder are several subfolders, organized by month. At the top of each month, I look in that month’s folder and send emails to various clients and leads. Depending on the results of those emails, I either remove them or I move them to another month to follow up on. Sometimes I get the standard response of “we’re good for now, but check back in March!” In which case, I’ll move that email to my March folder. I also have folders for other types of followups – local venues, directors, other designers, etc.
I also have a folder of resumes that people send me who are looking for work – yes, when I say “I’ll make sure to put it on file,” I actually mean that! I’ve frequently needed to find people for certain positions in certain cities and having a quick access to things that people have sent me over the years makes the task easier.

The final tool I’ll talk about today is Dropbox – probably one of the most important tools that I use on a day to day basis. I’m not going to spend a ton of time talking about it here, because Cory Pattak pretty much summed up the key points in his January 2019 article, “Dropping the Ball: The Etiquette of Dropbox Sharing.”
Sometimes some companies prefer Google Drive, but the principles remain the same.
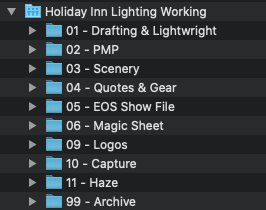
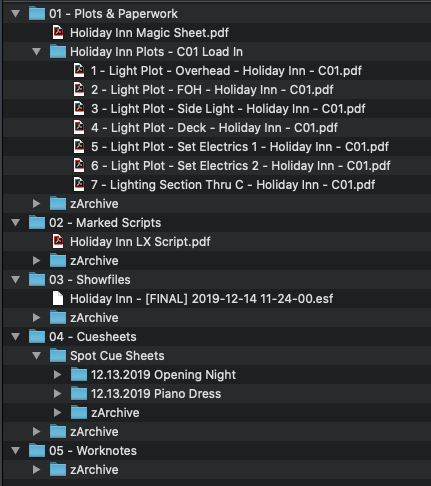
A typical dropbox structure for my team looks like this:
A “Working” folder
This folder is shared only between the members of the lighting team. This is where the raw files are held, things like the Vectorworks and Lightwright working files, the FileMaker host files, the Capture file, etc.
A “Public” folder
This folder is where all of the PDFs and “release” documents go. Typically this folder is nested inside of the overall production dropbox, but there are still companies in 2020 who are not using any kind of cloud sharing…
As Cory writes in his article linked above, version tracking, notifications, and deletion etiquette are absolutely essential for any cloud sharing system to succeed.
That’s all for today. I hope this was somewhat helpful for someone! There are some other important tools that I didn’t touch on here – favorites include Slack and Zoom. Maybe those will be their own posts someday!
mikewoodld